当我们在科学上网的过程中,有时候因为服务器到你本地延迟太高会影响我们使用,当服务器端所有配置满足需求的情况下(当然也包括线路问题),延迟太高绝对会引起病发直接会导致数据传输和影响访问速率,比如:网速非常卡,频繁掉包,那我们该如何降低延迟呢?如何改善呢?我们可以通过中转流量解决这个问题。服务器中转方法很多,今天我们通过v2ray来配置个非常简单的中转 温馨提示:今天我只讨论单纯中转,不讨论服务器线路
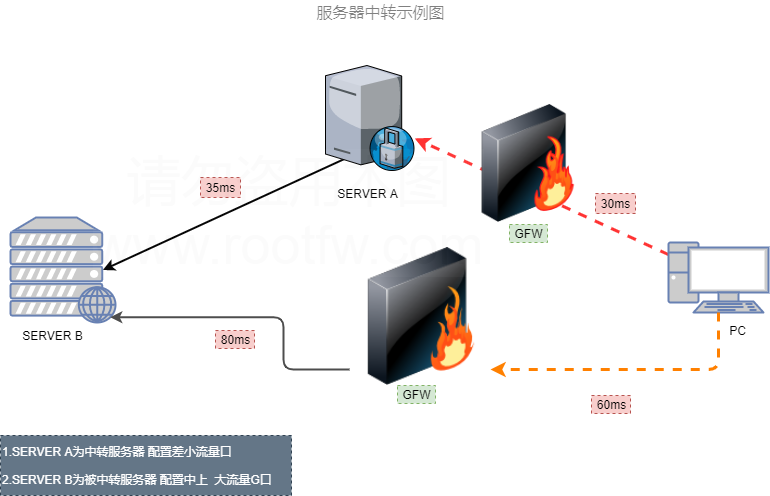
1.假设当PC访问SERVER B时延迟为60ms+80ms=140ms或者更高的延迟,且SERVER B是中上配置服务器,大流量G口。假设不是高峰期延迟在140以上140~560/ms之间,即使你服务器配置不错,大流量G口,因为延迟太高如果vps线路本身不是优化好的线路,病发可能性极高容易掉包。一旦频繁掉包会直接影响正常访问数据和网速
2.假设当PC通过SERVER A 中转服务器延迟在30ms,这台服务器配置不好,在通过中转服务器访问被中转服务器(最终访问外网节点服务器,假设这台服务器配置不错)SERVER B 在35ms延迟,一共65ms,对比上面140ms-65ms=75ms 降低了75ms延迟,这样的中转才有意义,在配合BBR内核优化效果是非常非常明显
Dokodemo door 是一个传入数据协议,它可以监听端口,进入此端口的数据发送到指定服务器的端口,从而达到端口映射的效果及流量转发。
本地环境 谷歌云centos7 64一台,vultr服务器centos7 64一台(当然你也可以使用其他版本服务器)https://www.vultr.com/?ref=8623585
电信网络100兆,PC电脑离路由器距离30米左右,隔两面墙壁 WiFi使用5G频段传输
安装v2ray 当然你也可以使用新版本v2ray脚本或者其他翻墙服务安装,自行谷歌搜索,本脚本是老版本v2ray,安装完毕后请自行配置相关config.json参数,并且保证配置成功后能顺利访问外网。
1
2
3
yum -y install curl bash <(curl -L https://raw.githubusercontent.com/v2fly/fhs-install-v2ray/master/install-release.sh) bash <(curl -L https://raw.githubusercontent.com/v2fly/fhs-install-v2ray/master/install-dat-release.sh)
移除v2ray(温馨提示:需要卸载请执行,反之误动)
1 bash <(curl -L https://raw.githubusercontent.com/v2fly/fhs-install-v2ray/master/install-release.sh) --remove
配置config.json
/usr/local/etc/v2ray/config.json 1 2 3 4 5 6 7 8 9 10 11 12 13 14 15 16 17 18 19 20 21 22 23 24 25 26 27 28 29 30 31 32 33 34 35 36 37 38 39 { "inbounds" : [ { "port" : 10073 , "protocol" : "vmess" , "settings" : { "clients" : [ { "id" : "e61f55bf-8450-4fa6-884e-4b46b64122c4" , "level" : 1 , "alterId" : 10 } ] } } ], "outbounds" : [ { "protocol" : "freedom" , "settings" : {} }, { "protocol" : "blackhole" , "settings" : {}, "tag" : "blocked" } ], "routing" : { "rules" : [ { "type" : "field" , "ip" : [ "geoip:private" ], "outboundTag" : "blocked" } ] } }
把v2ray配置信息中port打开(如果是谷歌云也可以添加防火墙规则)
1
2
firewall-cmd --zone=public --add-port=端口/协议 --permanent firewall-cmd --reload
然后看下能否正常访问外网,在这个前提下在继续往下看
配置Dokodemo door 准备另一台服务器比如谷歌云或者其他品牌服务器,同样安装v2ray官方脚本(请不要使用除官方脚本以外的一键安装脚本)
1 bash <(curl -L -s https://install.direct/go.sh)
温馨提示:可以使用vi或者vim或者nano编辑
1 vi /etc/v2ray/config.json
把初始的配置信息全部删除,长按键盘D键清除,在按键盘I键盘直到提示inster(没提示就多按一次),再把下面代码黏贴方法一
/usr/local/etc/v2ray/config.json 1 2 3 4 5 6 7 8 9 10 11 12 13 14 15 16 17 18 19 20 21 22 23 24 25 26 27 28 29 30 31 32 33 34 35 36 37 38 39 40 41 42 43 44 { "inbounds" : [ { "port" : 23213 , "listen" : "0.0.0.0" , "protocol" : "dokodemo-door" , "settings" : { "address" : "111.222.333.444" , "port" : 32334 , "network" : "tcp,udp" }, "tag" : "" , "sniffing" : { "enabled" : true , "destOverride" : [ "http" , "tls" ] } } ], "outbounds" : [ { "protocol" : "freedom" , "settings" : {} }, { "protocol" : "blackhole" , "settings" : {}, "tag" : "blocked" } ], "routing" : { "rules" : [ { "type" : "field" , "ip" : [ "geoip:private" ], "outboundTag" : "blocked" } ] } }
方法二
/usr/local/etc/v2ray/config.json 1 2 3 4 5 6 7 8 9 10 11 12 13 14 15 16 17 18 19 20 21 22 23 24 25 26 27 28 29 30 31 32 33 34 35 36 37 38 39 40 41 42 43 44 45 46 47 48 49 50 51 52 53 54 55 56 57 58 59 60 61 62 63 64 65 66 67 68 69 70 71 72 73 74 75 76 77 78 79 { "log" : { "access" : "/var/log/v2ray/access.log" , "error" : "/var/log/v2ray/error.log" , "loglevel" : "warning" }, "inbounds" : [ { "port" : 1231 , "protocol" : "vmess" , "settings" : { "clients" : [ { "id" : "#####" , "level" : 1 , "alterId" : 10 } ] } } ], "outbounds" : [ { "protocol" : "vmess" , "settings" : { "vnext" : [ { "address" : "#######" , "port" : 13245 , "users" : [ { "id" : "#####" } ] } ] } }, { "protocol" : "blackhole" , "settings" : {}, "tag" : "block" }, { "protocol" : "freedom" , "tag" : "direct" , "settings" : {} } ], "routing" : { "domainStrategy" : "IPOnDemand" , "strategy" : "rules" , "rules" : [ { "type" : "field" , "ip" : [ "geoip:private" ], "outboundTag" : "block" }, { "type" : "field" , "domain" : [ "geosite:cn" ], "outboundTag" : "direct" }, { "type" : "field" , "ip" : [ "geoip:cn" ], "outboundTag" : "direct" } ] } }
最后重启v2ray 查询v2ray是否运行成功
1
2
service v2ray restart service v2ray status -l
博主实际测试在没中转情况下非常非常慢和蜗牛速度一样,中转后速度直接提升到6w以上,我会在视频中详细讲解
电报群讨论组
.svg)